There’s something special about homemade white bread. The smell alone can transport you back to childhood—maybe your grandma’s kitchen, where a warm loaf would sit on the counter, waiting to be slathered with butter. There’s no comparison between store-bought and homemade. Freshly baked bread is softer, more flavorful, and just plain comforting.
But if you’ve ever tried making bread and ended up with something closer to a brick than a fluffy loaf, don’t worry. Bread baking has a learning curve, but once you get the basics down, it’s surprisingly easy. And once you make your first perfect loaf, you’ll never go back.
This guide covers everything: ingredients, steps, tips, and even common mistakes to avoid. Whether you’re a beginner or just looking to perfect your technique, you’ll find everything you need to make the softest, fluffiest homemade white bread.
Let’s get started.
Why Homemade White Bread is Better Than Store-Bought
Baking bread from scratch takes time, so why bother? There are plenty of reasons why homemade white bread is worth the effort.

- Better Flavor and Texture – Store-bought bread is often packed with preservatives and lacks that fresh, yeasty taste. Homemade white bread is richer and softer, with a crisp golden crust.
- No Artificial Additives – Packaged bread can contain stabilizers, artificial flavors, and preservatives to extend shelf life. When you bake at home, you control the ingredients, keeping it pure and simple.
- More Affordable – A loaf of high-quality bread from the store can cost $4 to $6, while making it yourself is often less than $2 per loaf. Over time, that adds up.
- Therapeutic and Satisfying – Kneading dough, watching it rise, and pulling a fresh loaf out of the oven is a rewarding process. There’s something calming about working with your hands in the kitchen.
- Completely Customizable – Whether you want a touch of honey, a softer crust, or a dairy-free version, making it yourself allows you to tweak the recipe to your taste.
Homemade white bread isn’t just about food—it’s about experience, tradition, and the simple pleasure of eating something made from scratch.
Essential Ingredients for the Best White Bread Recipe
Homemade white bread doesn’t require a long list of ingredients, but each one plays a key role in the final result. Here’s what you’ll need:
Basic Ingredients
- Flour – All-purpose flour works well, but bread flour is ideal for a chewier texture due to its higher protein content.
- Yeast – Active dry yeast or instant yeast can be used. Active dry yeast needs to be dissolved in water first, while instant yeast can be mixed directly into the flour.
- Water – Warm water (about 110°F) helps activate the yeast and hydrate the dough.
- Sugar – A small amount feeds the yeast and adds a touch of sweetness to the bread.
- Salt – Enhances flavor and regulates yeast activity to ensure proper rising.
- Butter or Oil – Adds moisture and richness to the bread. Butter gives a slightly richer taste, while oil creates a softer texture.
Ingredient Variations and Substitutions
For a slightly richer, softer loaf, you can substitute milk for water. Milk adds fat and natural sugars, giving the bread a more tender crumb. Using milk in bread is similar to its effect in desserts like crème brûlée. If you’re curious about how milk works in baking, check out this guide on using milk in crème brûlée.
With just these simple ingredients, you can make a classic, soft, and delicious loaf of homemade white bread.
Equipment You’ll Need
You don’t need a fancy setup to make homemade white bread, but having the right tools makes the process easier and more consistent. Here’s what you’ll need:
Basic Tools
- Mixing Bowl – A large bowl is essential for combining ingredients and allowing the dough to rise properly.
- Measuring Cups and Spoons – Accurate measurements are crucial in baking to ensure the right balance of ingredients.
- Loaf Pan – A standard 9×5-inch loaf pan gives the bread its classic shape. You can also use other pans for different styles, like baguette or sandwich bread.
- Dough Scraper (Optional) – Helps with shaping and handling sticky dough.
- Kitchen Scale (Optional) – Measuring ingredients by weight rather than volume ensures precision and consistency.
Helpful Extras
- Stand Mixer (Optional) – Speeds up the kneading process if you don’t want to do it by hand.
- Thermometer (Recommended) – Yeast thrives at specific temperatures. A kitchen thermometer helps ensure your water is between 105°F and 115°F for proper activation. You can also use it to check doneness—fully baked bread should have an internal temperature of 190°F to 200°F.
These basic tools are all you need to make perfect homemade white bread. With the right setup, you’ll have an easier time mixing, kneading, and baking a loaf that turns out great every time.
Step-by-Step Homemade White Bread Recipe
Now that you have your ingredients and equipment ready, it’s time to make the bread. This step-by-step guide will help you achieve a soft, fluffy loaf with a golden crust.
Step 1: Mixing the Ingredients – How to Get the Perfect Dough Consistency
- Activate the Yeast – If using active dry yeast, dissolve it in ½ cup of warm water (110°F) with 1 teaspoon of sugar. Let it sit for 5-10 minutes until it becomes foamy. If using instant yeast, skip this step and mix it directly with the flour.
- Combine Dry Ingredients – In a large bowl, whisk together 4 cups of flour, 2 tablespoons of sugar, and 1 ½ teaspoons of salt.
- Add Wet Ingredients – Pour in the activated yeast mixture (or instant yeast), along with 1 cup of warm water and 2 tablespoons of melted butter or oil.
- Mix Until a Rough Dough Forms – Use a spoon or your hands to combine everything until the dough starts coming together.
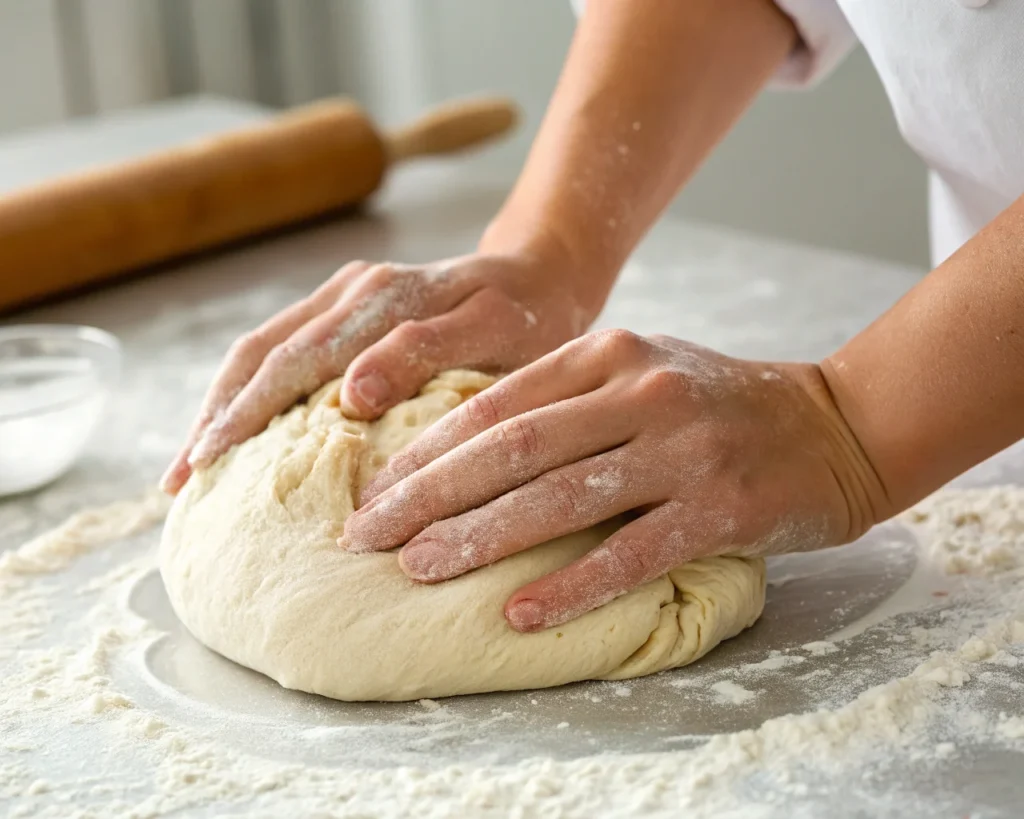
Step 2: Kneading Your White Bread Dough – Hand vs. Machine
- Turn the Dough onto a Floured Surface – Lightly flour a clean countertop or table.
- Knead for 8-10 Minutes – Use the heel of your hand to push the dough away, then fold it back over itself. Rotate slightly and repeat. The dough is ready when it becomes smooth and elastic.
- Check for Proper Kneading – A simple way to test is the “windowpane test.” Stretch a small piece of dough between your fingers—if it becomes thin and translucent without tearing, it’s kneaded enough.
If the dough is too sticky, add a tablespoon of flour at a time. If it’s too dry, sprinkle a little water and knead it in.
Step 3: First Rise – How to Proof Your Dough for the Best Texture (Fermentation)
- Place the Dough in a Greased Bowl – Lightly grease a bowl with oil and place the dough inside, turning it once to coat.
- Cover and Let it Rise – Use plastic wrap or a damp towel to cover the bowl. Let it sit in a warm place for 1 to 1.5 hours, or until it doubles in size.
A warm kitchen helps the dough rise faster. If your house is cold, you can let the dough rise inside an oven with just the light on.
Once the dough has risen, it’s time to shape it into a loaf.
Step 4: Shaping Your Loaf – Tips for Evenly Baked Bread
- Punch Down the Dough – Gently press down on the risen dough to release excess air. This helps create a more even texture.
- Turn it onto a Lightly Floured Surface – Use a dough scraper or your hands to remove it from the bowl.
- Shape into a Loaf – Flatten the dough into a rough rectangle, then roll it tightly from the short end. Pinch the seam closed and tuck the edges under to create a smooth shape.
- Place in a Greased Loaf Pan – Lightly oil a 9×5-inch loaf pan and place the dough inside, seam side down.
Step 5: Second Rise – The Secret to Extra Soft White Bread
- Cover the Dough – Use a towel or plastic wrap and let it rise again for 30-45 minutes, or until it puffs up and reaches about an inch above the pan.
- Check for Readiness – Lightly press a finger into the dough. If it slowly springs back, it’s ready to bake. If it deflates, it may have over-proofed.
The second rise is just as important as the first. Rushing it can result in dense bread instead of a soft, airy loaf. If you’ve ever had issues with bread not rising properly, you might relate to common baking mistakes—similar to how crème brûlée can go wrong if not prepared correctly. If you’re curious about that, check out this article on how to mess up crème brûlée.
Step 6: Baking Your Bread – Temperature, Timing & Pro Tips
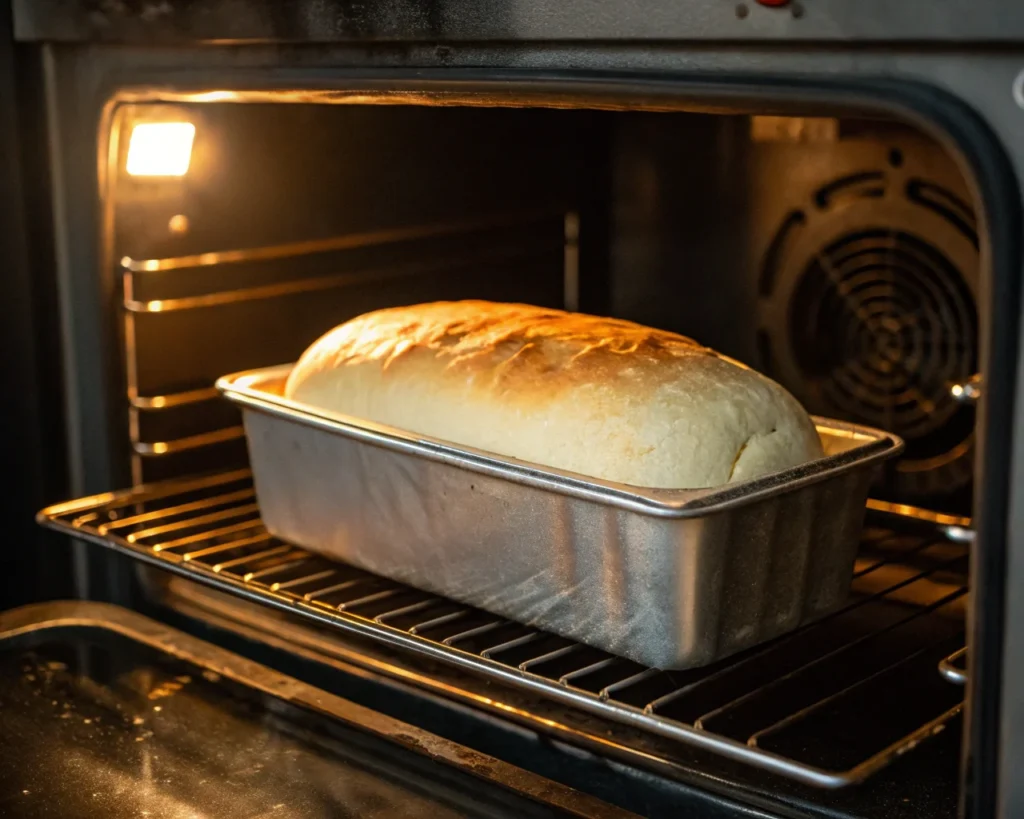
- Preheat the Oven to 375°F – Let the oven fully heat while the dough finishes its second rise.
- Bake for 25-30 Minutes – The bread is done when the crust turns golden brown and sounds hollow when tapped.
- Check Internal Temperature – If you want to be precise, use a thermometer. The bread should reach 190°F to 200°F inside.
If the top is browning too quickly, cover it loosely with foil for the last 10 minutes.
Once the bread is out of the oven, it’s tempting to slice into it immediately, but hold off for the best results.
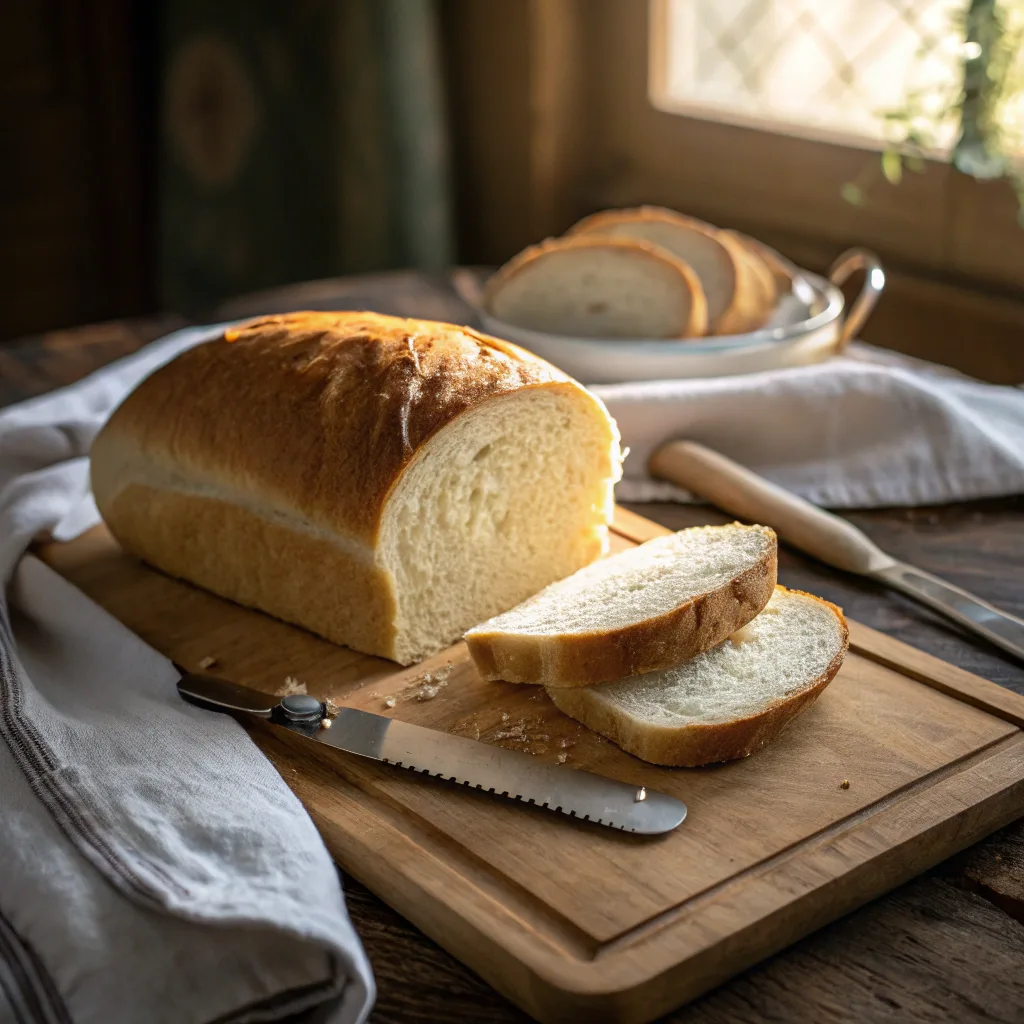
Step 7: Cooling & Slicing – When and How to Cut Your Loaf Properly
- Remove from the Pan – Let the bread sit in the pan for 5-10 minutes, then transfer it to a wire rack.
- Cool Completely Before Slicing – Cutting too soon releases steam and can make the inside gummy. Wait at least 30 minutes for the crumb to set properly.
This waiting period is similar to resting other baked goods, like sweet potato pies, which need time to cool to avoid cracking. If you want tips on keeping desserts from cracking, check out how to prevent sweet potato pie cracks.
Once cooled, the bread is ready to slice and enjoy. Whether you’re making toast, sandwiches, or just spreading butter over a warm slice, nothing beats fresh homemade bread.
Pro Tips for the Softest, Fluffiest White Bread
Even with a great recipe, small tweaks can take your homemade white bread to the next level. Here are some expert tips to help you get the best texture and flavor every time.
1. Use Bread Flour for a Chewier Texture
All-purpose flour works fine, but bread flour has more protein, which helps create a stronger gluten network. This results in a chewier, stretchier crumb. If you love bakery-style bread with a bit more chew, it’s worth making the switch.
2. Knead Until the Dough is Smooth and Elastic
Under-kneading can lead to dense bread. The best way to check if your dough is kneaded enough is the windowpane test—stretch a small piece between your fingers. If it becomes thin and translucent without tearing, the gluten is properly developed.
3. Let the Dough Rise in a Warm Place
Yeast thrives in warmth. If your kitchen is cold, place the dough inside an oven with just the light on or near a warm spot. A slow rise at the right temperature develops better flavor and texture.
4. Don’t Overproof the Dough
While rising is crucial, letting the dough rise for too long can weaken its structure. If the dough has risen too much, it may collapse in the oven. A simple test: Gently press the dough with your finger. If it springs back slowly, it’s ready. If it deflates, it’s over-proofed.
5. Steam the Oven for a Softer Crust
Professional bakers often add steam to their ovens for a softer crust. You can replicate this by placing a pan of hot water on the bottom rack while baking. This keeps the surface moist, allowing the bread to expand before forming a crust.
6. Brush with Butter for Extra Flavor
Brushing the bread with melted butter right after baking gives it a rich flavor and a softer crust. If you prefer a shinier look, an egg wash before baking will create a golden, glossy crust.
7. Store Properly to Keep it Fresh
Homemade bread has no preservatives, so it can dry out faster than store-bought. Store it in an airtight bag at room temperature for up to 3 days, or freeze slices for longer storage.
For more storage tips, check out how to freeze cooked chicken—while it’s about chicken, the same freezing principles apply to keeping foods fresh.
Following these tips will help ensure your homemade white bread turns out light, fluffy, and flavorful every time.
Common White Bread Mistakes and How to Avoid Them
Even experienced bakers run into problems when making bread. If your homemade white bread didn’t turn out as expected, here are some common mistakes and how to fix them.
1. Bread Didn’t Rise Properly
If your dough didn’t rise, one of these issues might be the culprit:
- Yeast Was Inactive – Always check that your yeast is fresh. Expired or improperly stored yeast won’t work. To test it, dissolve a small amount in warm water with sugar—if it doesn’t foam in 10 minutes, it’s dead.
- Water Temperature Was Off – If the water is too hot, it kills the yeast. If it’s too cold, the yeast won’t activate. Stick to 105-115°F for the best results.
- Dough Was in a Cold Environment – Yeast needs warmth to rise. If your kitchen is chilly, let the dough rise in a slightly warmed oven or near a sunny window.
2. Bread Turned Out Too Dense
A heavy or dense loaf usually means the dough didn’t develop enough gluten. The most common causes are:
- Under-kneading – If the dough isn’t kneaded long enough, it won’t have enough strength to trap air. Knead until smooth and elastic.
- Too Much Flour – Adding extra flour when kneading can make the dough dry and tough. It should be slightly sticky but still workable.
- Overproofing – Letting the dough rise too long weakens its structure, causing it to collapse in the oven.
3. Crust is Too Hard or Thick
If your crust is tougher than expected, consider these factors:
- Baked Too Long or at Too High a Temperature – Stick to 375°F for 25-30 minutes and check for doneness with a thermometer.
- No Steam During Baking – A dry oven can lead to a thick crust. Place a small pan of hot water in the oven to create steam.
- Skipped Butter Brushing – Brushing melted butter on the crust right after baking softens it.
If you’re looking for other ways to fix common baking problems, you might find how to mess up crème brûlée useful. While it’s about dessert, many baking mistakes overlap.
4. Bread is Too Dry
Homemade bread can dry out quickly if not stored properly. To keep it fresh:
- Store in an Airtight Container – A sealed plastic bag or bread box works best.
- Don’t Refrigerate – The fridge actually makes bread stale faster.
- Freeze for Longer Storage – Slice the loaf and freeze portions to keep them fresh for weeks.
If you’ve ever had dry cornbread dressing, you know that proper storage matters. Here’s a guide on how to moisten dry cornbread dressing that follows similar principles.
Avoiding these mistakes will help you bake soft, fluffy white bread every time. If your first loaf isn’t perfect, don’t stress—baking is all about learning and adjusting.
The Best Way to Store and Keep Homemade Bread Fresh
Homemade white bread doesn’t have preservatives, so it won’t last as long as store-bought loaves. Proper storage is key to keeping it fresh for as long as possible.
1. Storing at Room Temperature
For short-term storage (up to 3 days), follow these tips:
- Wrap It Well – Store bread in a plastic bag, airtight container, or bread box to keep it from drying out.
- Keep It in a Cool, Dry Place – Avoid direct sunlight or heat sources, which can cause the bread to go stale faster.
- Don’t Refrigerate It – The fridge speeds up staling because cold temperatures dry out the bread.
2. Freezing for Long-Term Storage
If you don’t plan to eat the bread within a few days, freezing is the best option. Here’s how:
- Let It Cool Completely – Slicing warm bread before freezing can create excess moisture, leading to freezer burn.
- Slice Before Freezing – Pre-sliced bread is easier to thaw and use as needed.
- Wrap Tightly – Use plastic wrap, aluminum foil, or freezer bags to prevent freezer burn.
- Use Within 3 Months – Frozen bread stays fresh for up to 3 months. To use, thaw at room temperature or toast straight from the freezer.
If you want more freezing tips, check out can you freeze cooked chicken—while it’s about chicken, the same principles apply to keeping food fresh in the freezer.
3. Reviving Stale Bread
If your bread has started to go stale, don’t toss it out. Try these tricks to bring it back to life:
- Warm It Up – Wrap the bread in foil and heat it in a 325°F oven for 10-15 minutes.
- Sprinkle with Water – Lightly mist the crust with water before reheating to add moisture.
- Make Toast or Croutons – Stale bread works perfectly for toast, breadcrumbs, or croutons.
With the right storage methods, you can keep your homemade white bread fresh and delicious for days or even weeks.
The Science Behind Bread Baking
Understanding the science behind homemade white bread can help you improve your technique and troubleshoot problems. Every ingredient and step plays a role in creating the perfect loaf.
1. How Yeast Makes Bread Rise
Yeast is a living organism that feeds on sugar and produces carbon dioxide gas. This gas gets trapped in the dough, causing it to expand and rise.
- Active Dry Yeast vs. Instant Yeast – Both work the same way, but instant yeast is more finely ground and doesn’t need to be activated in water first.
- Fermentation Time – Longer fermentation develops better flavor. That’s why some bakers let their dough rise slowly in the fridge overnight.
2. The Role of Gluten in Bread Texture
Gluten is the protein in wheat flour that gives bread its structure. When you knead dough, you stretch and strengthen the gluten strands, allowing the bread to hold air and rise properly.
- Too Little Kneading – Results in a dense, crumbly loaf because the gluten isn’t strong enough.
- Too Much Kneading – Can make the bread tough by over-developing the gluten.
3. Why Temperature Matters
- Water Temperature – Yeast thrives between 105-115°F. If the water is too hot, it kills the yeast. If it’s too cold, fermentation slows down.
- Baking Temperature – Bread bakes best at 375°F, which allows it to rise fully before the crust hardens.
4. The Secret to a Golden Crust
The brown, crispy crust comes from the Maillard reaction, a chemical process between amino acids and sugars when exposed to heat.
- Adding Sugar – A small amount of sugar speeds up browning and enhances flavor.
- Egg Wash or Butter – Brushing the dough before baking gives a golden, glossy crust. Butter after baking keeps it soft.
If you like learning about food science, you might enjoy reading about the difference between crème brûlée and custard—it’s another example of how simple ingredients transform with heat and technique.
Once you understand these principles, you’ll be able to make adjustments and improve your homemade white bread every time you bake.
Variations and Customizations – Creative White Bread Recipes
One of the best things about homemade white bread is how easy it is to customize. With a few simple tweaks, you can create different flavors and textures to suit your taste.
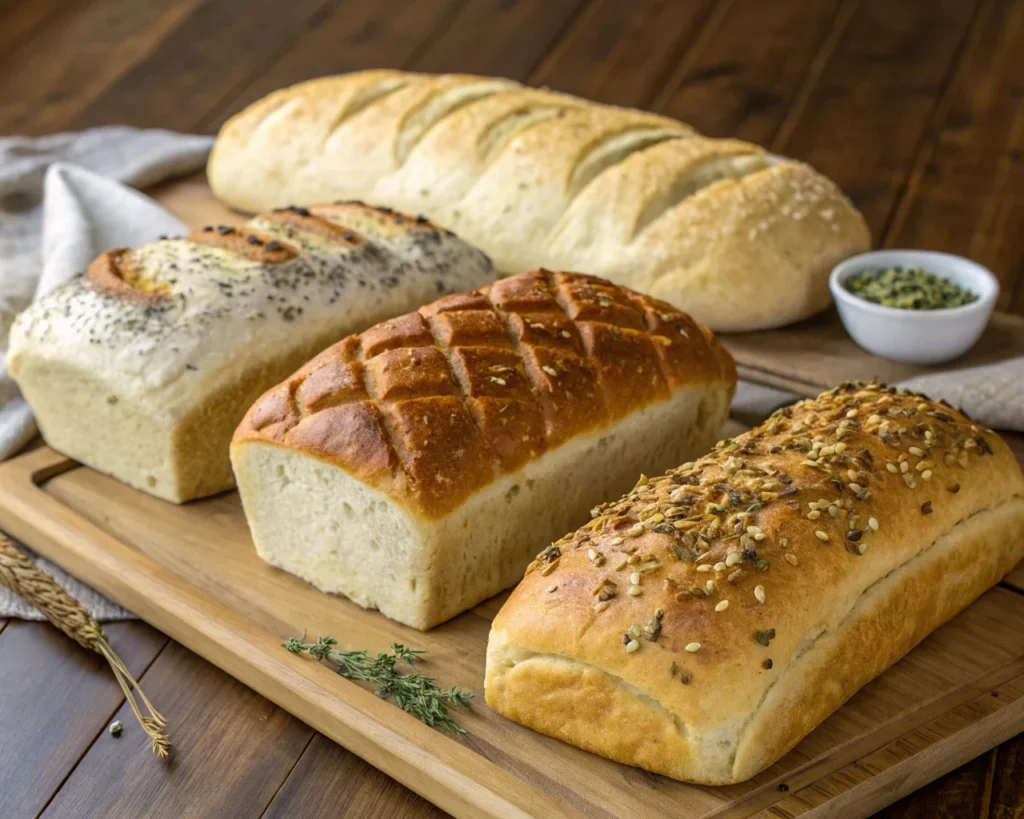
1. Easy Honey White Bread – A Sweeter, Softer Version
Replace the sugar with honey for a slightly sweeter, richer flavor. Honey also helps keep the bread moist longer.
2. Buttery Milk Bread
Substituting milk for water results in a softer crumb and a richer taste. Whole milk works best, but you can also use 2% or even buttermilk for a slight tang.
3. Garlic & Herb White Bread – A Flavorful Twist
Mix in 1 teaspoon of garlic powder and 1 tablespoon of Italian seasoning for a flavorful twist. You can also brush the crust with garlic butter after baking.
4. Whole Wheat and White Bread Hybrid – Healthier & Soft
For a more nutritious loaf, swap half the flour with whole wheat flour. Keep in mind that whole wheat absorbs more liquid, so you may need a little extra water.
5. Turning Your White Bread Dough into Dinner Rolls
Instead of shaping the dough into a loaf, divide it into 12 equal pieces, roll them into balls, and place them in a greased baking dish. Bake at 375°F for 18-20 minutes for soft, fluffy dinner rolls.
If you love customizing recipes, you might enjoy experimenting with homemade sweet potato pies, which can also be adjusted for different flavors and textures.
With these variations, you can make homemade white bread in different styles to suit any meal or preference.
Final Thoughts – Why You Should Try This White Bread Recipe Today
Making homemade white bread is easier than it seems, and the results are well worth the effort. A fresh, warm loaf straight from your own kitchen beats anything from the store—both in flavor and quality. With just a few simple ingredients and the right techniques, you can create soft, fluffy bread that’s perfect for sandwiches, toast, or just enjoying with a little butter.
If you’ve struggled with dense bread, tough crusts, or loaves that don’t rise properly, don’t get discouraged. Baking is a skill that improves with practice, and every mistake is just part of the learning process. By following the tips in this guide, you’ll get better with each loaf.
Now that you have a foolproof recipe, why not try making a batch this weekend? Whether you stick with classic white bread or experiment with variations, homemade bread is one of the most satisfying things you can bake.
FAQs: Answers to Your Homemade White Bread Questions
What is the secret to making homemade bread?
The key to perfect homemade bread is proper kneading, allowing the dough to rise fully, and baking at the right temperature. Using quality ingredients, especially fresh yeast and the right flour, also makes a big difference.
Is it cheaper to make your own white bread?
Yes, making white bread at home is significantly cheaper than buying store-bought loaves. A homemade loaf typically costs under $2, while high-quality store-bought bread can cost $4-$6.
What flour is best for white bread?
Bread flour is the best option because it has a higher protein content, which helps develop gluten and creates a chewier, fluffier loaf. However, all-purpose flour works well too.
Is homemade white bread healthier?
Yes, homemade bread is healthier because it contains no preservatives, artificial additives, or unnecessary sugars. You control the ingredients, making it a cleaner, more natural option.
What not to do when making bread?
Avoid using old yeast, rushing the rise time, or adding too much flour, which can make the bread dense. Also, make sure to knead the dough properly and bake at the correct temperature.
What makes homemade bread light and fluffy?
Proper kneading, allowing the dough to rise fully, and using the right amount of yeast and liquid all contribute to a soft and airy loaf. Bread flour also helps create a lighter texture.
What is the healthiest flour for bread?
Whole wheat flour, spelt flour, and oat flour are some of the healthiest options. They contain more fiber, vitamins, and minerals compared to refined white flour.